Currently viewing the category: "Exercises"
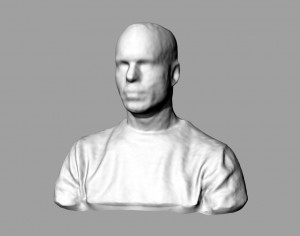
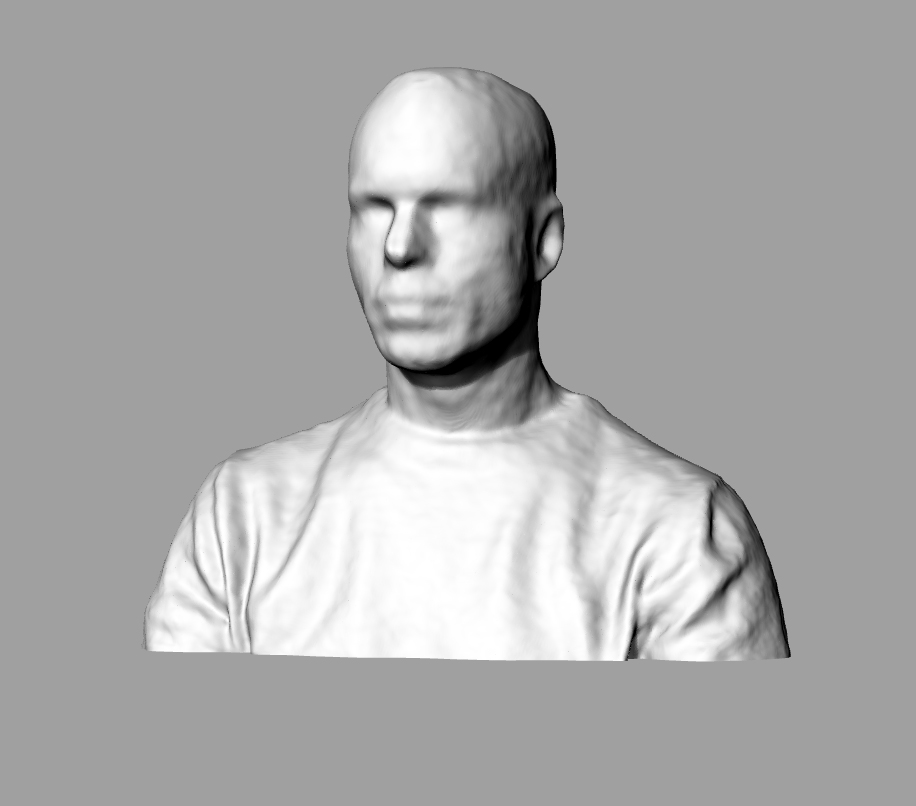
  1. Use K-Scan to scan your head and shoulders. Instructions are available here.
  2. Use the Makerbot Digitizer via Prof. Meiser’s laptop to scan a small object.
  3. Use 123d Catch with your smartphone to scan something of your choosing.  examples
  4. Once you’ve completed your three scans you’ll want to save them in STL or OBJ format.
  5. Post a screenshot of each scan on the private class website in the research binder category.  For each screenshot, please include information about the scanner used so we can compare the level of quality offered by each method.
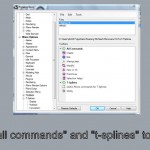
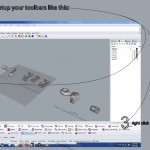
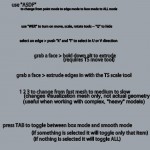
  6. Learn how to modify your meshes by watching the video included below.  Watch from 1:50 to 3:20 and from 8:45 to 10:15.  If you think you may be interested in using the CNC router in your third and final project of the semester then watch the end of the video starting at 11:10.
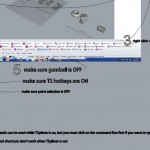
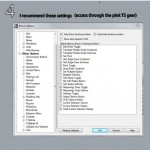
  7. Prepare one of your three scans for 3d printing by following this tutorial.
  8. Save your finished file in Rhino 3dm format with your name (for example: JoeMeiser.3dm)
  9. Place your file in the digital sculpture netspace shared folder.

 Video on working with meshes

video platform video management video solutionsvideo player

Note: If these videos don’t display in your web browser, be sure that you’re at http://sculpture1.blogs.bucknell.edu instead of https://sculpture1.blogs.bucknell.edu. Apparently, removing the “S” from the http makes a big difference in the security settings for the page.


1) Finish your T-Splines bunny. Create a render or screenshots of your work, and post to the public class website.

2) Use Makehuman, Blender, and T-Splines to create something amazing. In this technical exercise please make use of all three programs so that you’ll understand the full workflow. Post screenshots or renders of your work on the public class website.

3) On our the Moodle page for our class, watch the 30-minute video titled Cremaster 3: The Order.  This link should take you to the video: http://moodle.bucknell.edu/mod/page/view.php?id=341854

4) Using the steps from of the Art Report, post a written response to this video in the research binder section of the private class website.


baby.22

Makehuman

  • Go to the start bar and launch Makehuman
  • Use the program to customize a human figure
  • When finished, click: files > export > and select Blender exchange (mhx) format
  • Enter a file name and click the export button

Blender

  • Go to the start bar and launch Blender
  • Right click on the startup cube and delete
  • Go to file > user preferences > addons > and under import/export, click to activate Makehuman imports, then close user preferences
  • Go to file > import > mhx > and locate the file you exported from Makehuman  (On my machine, exported files go to documents > makehuman > export) Select your file > click the import MHX button at the top right
  • After you’ve done this, your figure should be loaded
  • The controls in Blender are much different than in Rhino.  Here are the most important controls:
    • Orbit with middle mouse button
    • Pan with middle mouse button and shift
    • Zoom by rolling middle mouse button
    • Select with right mouse button
    • Zoom selected by pressing the  .  button on the numberpad
    • 5 toggles orthographic viewing mode
    • 1,2,3,4,6,7,8,9 will show front, right, top views, etc.
    • To pose:
      • Right click on a pose handle
      • Once a handle is selected, press G to translate
      • Press Z, X, or Y to constrain movement
      • With a handle selected, press R to rotate
      • *Notice that translations and rotations are impacted by your point of view. Compare the results you get when looking from the front, side, top, etc.
      • Move to new location and press left mouse button to apply
      • Undo with CTRL Z
      • More information on moving in Blender can be found here: http://wiki.blender.org/index.php/Doc:2.6/Manual/3D_interaction/Transformations/Basics/Grab
      • To export:
        • First, save as a blender file in case you need to return to the file later.
        • Next, go to file > export > OBJ
  • Helpful links:

In Rhino

  • File > Import
  • Mesh can be point edited by pressing F10, but since meshes are difficult to edit, this is only really effective for deleting unwanted body parts.
  • To further edit the figure, it is best to use T-Splines by following these steps:
    • Activate T-Splines by pushing the “power button” for the program
    • In the lower left, click to “Convert NURBS or mesh to T-Spline”
    • Your human form should appear more faceted if this command works because it will convert to a T-Splines mesh in box mode.
    • Press TAB to toggle to smooth mode.  Note: Makehuman figures have complex geometry and can take a long time to smooth. It is generally best to make modifications in box mode, and convert to smooth mode at the end just before exporting to NURBS.
    • Before exporting your T-Spline form to Keyshot you’ll want to convert your forms to smooth mode in t-spines, then convert to Rhino NURBS (use the far left button next to the tsplines power button)
    • It is possible to use symmetry with a Makehuman mesh. Watch these videos to learn how:
  • To further your knowledge of T-Splines, watch the tutorials available here: http://www.tsplines.com/store/tstutorials.html


The T-Splines crash course file can be found in the netspace digital sculpture exercise folder.  To open this file, select the folder named “Intro to TSplines” and download it to your desktop.  Then open the Rhino file contained within the folder.

For easy access, here are screenshots of some of the first instructions covered in this crash course:

For more information, refer to the T-Splines user manual, or the starter guide.

—-

T-Splines Bunny Exercise

 T-SPLINES EXERCISE REFERENCE IMAGES

Screenshots of Prof. Meiser’s demo on the bunny


video platform video management video solutionsvideo player

If video fails to load, click here: http://digitalsculpture.blogs.bucknell.edu/t-splines-introductory-exercise/


Before the start of class on 3/18, please go to the link below and watch the introductory video, and the eight videos about the user interface.  These videos are very brief, so in total, you should be able to get through all of them within an hour.  By watching these videos before class you will have a fundamental understanding of T-Splines that will be very helpful as we get started using the program.

http://www.tsplines.com/step-1.html


Link to radio images

video platform video management video solutionsvideo player

Note: If this video doesn’t display in your web browser, be sure that you’re at http://digitalsculpture.blogs.bucknell.edu instead of https://digitalsculpture.blogs.bucknell.edu.  Apparently, removing the “S” makes a big difference in the security settings for the page.


Rubber Duck:

Headphones:

  • In this tutorial you will create a set of headphones.  Simply follow along with the tutorial. To find the tutorial instructions, open the Rhino User’s Guide and go to page 77
  • Note that this tutorial incorporates a Rhino file that is available in the netspace folder at: computer > projects (\\netspace) > DigitalSculpture > private > exercises > 1-20-2015
  • When you have finished, please post some screenshots of your work to the public class website at: http://arst349.blogs.bucknell.edu/

Earbuds:

  • Please watch this tutorial and then post a few questions about the it to the research binder category of the private class website.  We will discuss some of the questions in class on Tuesday.  Note that it is not necessary to actually create the earbuds.  http://vimeo.com/76114288
 

To access the exercise files, go to the digital sculpture folder on Bucknell’s netspace by following this path: click on the start button in the lower left of the screen > computer > projects (\\netspace) > DigitalSculpture > private > exercises > then right click on the 1-15-2015 folder and save to your desktop)

This weekend, when you have finished your reconstruction of the Parthenon, please take a few screenshots of your work from different angles.  I suggest using the “snipping tool” to create your screenshots.  This can be found by looking in the accessories folder within the computer’s list of programs.  To receive credit for your work, please upload your screenshots to the class website by following these instructions:

  1. Log on to the site by going to: https://digitalsculpture.blogs.bucknell.edu/wp-admin/
  2. Create a new post by clicking at the top of the page on the “+ New” button
  3. Once the post screen comes up, check the “research binder” box to the right to put the post in the right category
  4. Upload photos by clicking on the “upload/insert” button above the text field (remember to click the “insert into post” button while you’re on the upload screen)
  5. * So that I can give you credit for your work, don’t forget to put your name in the title of the post

video platform video management video solutionsvideo player


1) Rotate part to desired orientation

2) Run the “fillmeshholes” command

3) To be 3-D printed, meshes must be watertight solids

  • Check to see if mesh is solid by running the “what” command.  In the description, a watertight mesh will be listed as closed.
  • Alternatively, the “volume” command can be used to see if a mesh is solid.  If a volume is specified with no warning then the mesh is okay.  If, however, a warning appears about the mesh not being closed then you’ll have some work to do.

4) If an error occurs or you cannot close the mesh, run the “meshrepair” command and follow the prompts.  You may need to adjust the settings and/or run this command a couple of times to fix all of the problems.

1

5) Once your mesh is closed, you’ll want to give it a flat bottom by doing as follows:

Create a NURBS box that intersects your mesh as shown below

2

Select the NURBS box and run the “mesh from NURBS object” command.  This is one of the first options in the mesh menu at the top of the screen. (Or type “mesh” in the command line)

Run the “meshbooleandifference” command.  Select your body mesh first, then the box.  This command may take a few moments to process. Your result should be as shown below:

3


If the mesh boolean difference command repeatedly fails then you may need to create a new box with a mesh of greater density, as shown below.


If you want to join additional features to your mesh then you can use a similar process, but with the “meshbooleanunion” command

If you’d like to learn more about preparing Rhino files for 3D printing then watch this video: https://vimeo.com/80478910