Step 1: Create a new folder for your project
When creating custom materials you’ll be working with a Keyshot file and a number of other image files. From one work session to the next, it’s easy to misplace your images, and if you open a Keyshot file and the program can’t locate the image files, your custom materials won’t show up properly. If this happens you’ll lose time and need to redo a number of steps. To keep this from happening I suggest creating a new folder in your netspace for your Keyshot project, and then save your Keyshot file and all of your custom material image files to that one folder. Then, when you backup your project to an external hard drive you’ll want to copy the whole folder.
Step 2: Create a seamless image with Photoshop
This youtube video will show you how. Watch from the beginning to 4:30.
Contrary to what the narrator suggests, I’ve found that the clone stamp works quite well for removing seams.
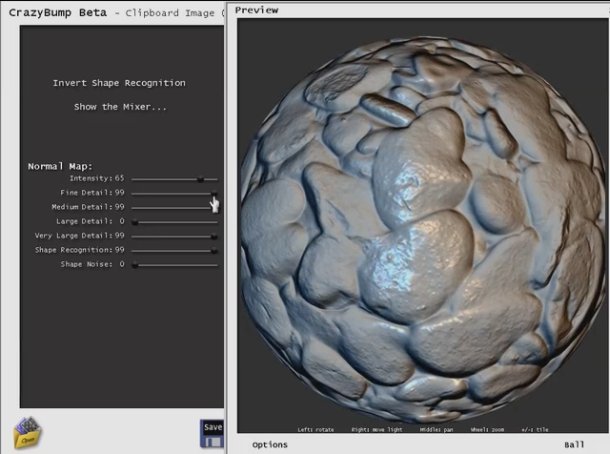
Step 3: Create bump/normal maps, and specular maps with Crazy Bump
Watch from 1:00 to 4:00, and from 7:30 to 10:00: http://www.blenderguru.com/tutorials/the-secrets-of-realistic-texturing/
Although Andrew Price’s Blender Guru tutorial covers texturing in Blender, it’s still relevant to our workflow in Keyshot. One key difference, though, is that in Keyshot we’ll use only the following: the color map (which you created in step 1), the bump/normal map, the specular map
Crazy Bump offers a free trial; download it here.
Step 4: Apply your Crazy Bump files in Keyshot
These instructions explain the process
Step 5: Learn about the various methods of texture mapping available in Keyshot
These tutorials will help you determine what kind of mapping (spherical, cylindrical, box, UV, etc.) is most appropriate for your form. The default is box, which works well in most situations.
https://www.keyshot.com/keyshot3/manual/texturing/texture_mapping.html
Keyshot texture overview youtube video
Step 6: Learn how to use UV coordinate mapping when necessary for complex forms
With some really complex forms you’ll find that mapping with box, spherical, cylindrical, etc., doesn’t give good results. It is sometimes necessary to unwrap complex forms and use the UV editor to align the unwrapped form with the image you created in step 1. I had to use this process in my Seneca project because all of the other mapping methods produced visible seams. In the Seneca project, by unwrapping and using the UV editor I was able to put the seams on the back of the warthog’s legs so they wouldn’t show up in the renders. I also used this process in my Aristotle project to make the wood grain align properly with the boat.
Watch this youtube video from 6:30 to 9:00
Additional resources
Advanced Keyshot tutorial videos on material creation (skip to lesson 3 if short on time):
- Lesson 1: The basics
- Lesson 2: Using textures
- Lesson 3: Putting it all together